![]()
This support notes are suitable for:
- ABSS Accounting
- ABSS Premier
|
Introduction One great feature of ABSS software is that it allows you to customise the look of your invoices, purchase orders, cheques and mailing labels. |
What are ABSS Forms?
ABSS Forms are used by ABSS for printing:
- Cheques and cheque stubs - Spend Money, Pay Bills and Paycheques
- Sales - Statements, Invoices and Receipts
- Bills
- Mailing Labels
ABSS's forms are fully customisable and are saved as individual files that are separate to your company file. They are stored in the ABSS\Forms folder and can be backed up with your company file. For information on backing up your ABSS data, please refer to support notes on backing up and restoring.
How do I access ABSS's forms?
To access the various ABSS forms:
- Click Setup, followed by Customised Forms.
- Select the desired Layout and Form to Customise options.
- Click Customise.
Alternatively, if you select an option from one of the command centres such as Print Cheques in the Banking command centre, you can click Customise in the Forms Selection window.
How do I set a form's page size and other properties?
After opening the form to be customised, click the Form Properties Tool which is located on the form‘s tool palette - please refer to the section titled What tools are available for customising ABSS Forms? for the location of the Form Properties Tool.
The window below shows the Form Properties dialogue box. Notice there are two tabs titled Layout and Options.
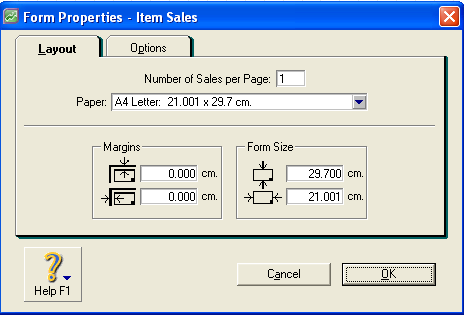
Layout tab
Please Note: 00 In this section, 'Form' refers to the area of the page that is used for printing.
# of (Sales, Purchases, Statements, Slips, Receipts or Cheques) per Page - Specify the number of documents (sales forms, purchases forms, statements or cheques, depending upon the type of form you're printing) that you wish to print an a single page.
This field does not appear when you are printing mailing labels.
Paper - Select the size of the paper loaded in your printer.
Margins (from top) - This field allows you to enter coordinates to position the Form at a specific location on the paper. Enter the number of centimetres that you want the form to print from the top of the page.
Margins (from left) - This field allows you to enter coordinates to position the Form at a specific location on the paper. Enter the number of centimetres that you want the form to print from the left side of the page.
Form Size (height) - This field allows you to enter the vertical size of the Form.
Form Size (width) - This field allows you to enter the horizontal size of the Form.
Options tab
The window below shows the Form Properties Options tab.

Grid Options
- Check Show Grid to make the alignment grid appear in the Form layout area of the Customise window.
- Check Snap to Grid if you want the top and left edges of every field to align automatically with the nearest grid lines.
- Grid Size - Select a measurement from the drop-down menu to adjust the size of the squares in the alignment grid.
Background Options
- Click Insert Background to insert a graphic file in the background of your form.
- Display - Use the options in the Display list to determine how your background graphic will appear on the form.
- Sample Display area - A sample of your current grid and background settings appears here.
For detailed information on applying graphics to forms, please refer to our support note titled Graphics in Forms.
How do I reposition a form's elements?
Your form's elements (fields, lines, pictures, etc.) can be quickly repositioned by using standard ‘drag and drop‘ principals.
Moving a single element:
- Place your cursor on the element to be moved.
- Hold down your left mouse button and 'drag‘ the element to the desired position.
- Release the mouse button to 'drop' the element.
Please note: so If you are moving a field and the Snap to Grid option is selected (refer to Grid Options above), when you release your mouse button the field will automatically align with the nearest grid line. This is a great tool for quickly aligning all the fields in a form.
Moving a group of elements
- Hold down the <shift> key on your keyboard.
- Click once on each field or element to be moved (releasing the mouse button after selecting each element).
- After selecting the last element of the group, release both the mouse button and the <shift> key.
- Place your cursor over one of the selected elements then hold down your left mouse button. While holding your mouse button, drag the group of elements to the desired position.
- Deselect the group of elements by clicking on a blank portion of the form.
How do I format the fields on a form?
Formatting your ABSS forms is easy, as the different Form types all share the same field types and formatting tools.
The window below shows a standard ABSS Invoice Form.
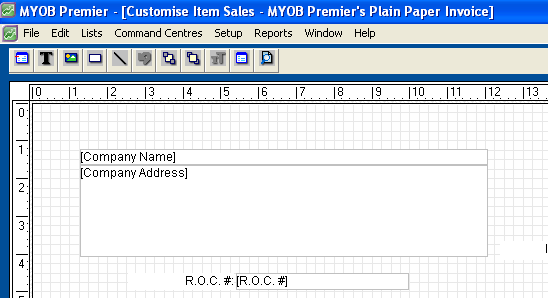
Form fields
ABSS forms mainly consist of Data Fields and Text Boxes.
- Data Fields - are easily recognised by their faint borders and the brackets surrounding their name. Although a data field's properties can be changed, the printed data is program generated. For example, referring to the window above, the [Company Name] Data Field prints the company name entered in your company file's setup.
- Text Box - These fields appear without a border and are generally used for headings. Additional Text Fields can be created and the text within them can be changed.
Double clicking on the Data Fields and Text Boxes will cause their Field Properties window to be displayed. The window below shows the Field Properties for R.O.C. number text field.
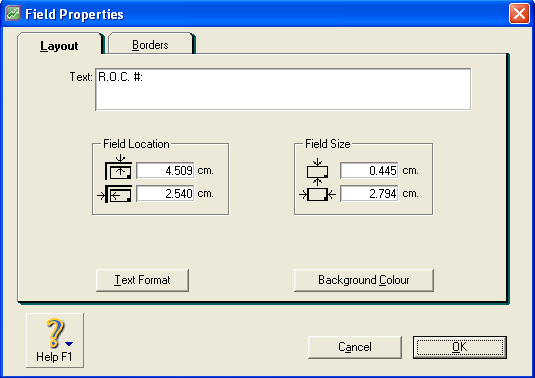
Please Note:
- Text to be printed on the form is entered in the Text field.
- The Data Fields and Text Boxes share the same formatting options. Notice that the window has two tabs - Layout and Borders. The options and fields listed under each tab are outlined below.
Layout tab
- Text (field not available for Data Fields) - Enter or change the text for the field you selected in the Customise window.
- Field Location (from top) - Use this field to enter coordinates that will position the field at a specific location on the form. Enter the number of centimetres from the top of the page where you want the field to print.
- Field Location (from left) - Use this field to enter coordinates that will position the field at a specific location on the form. Enter the number of centimetres from the left-hand side of the page where you want the field to print.
- Field Size (height) - Use this field to specify the vertical size of this field. Enter the height in centimetres.
- Field Size (width) - Use this field to specify the horizontal size of this field. Enter the width in centimetres.
- Text Format button - Click this button to launch the text formatting window, where you can determine the field's text characteristics.
- Background Colour - Click this button to select a background colour for the field. You can choose a background colour from the palette provided, or you can define and use custom colours.
Borders
- Border Layout - Mark the Left, Top, Right or Bottom boxes to create borders for the field. If you want the border to have rounded edges, mark Rounded Edges.
- Border Colour - Click this button to select a colour for the border of this field.
- Border Width - Select a width for the lines in the border.
- Preview - This area displays a preview of how the text or data will be printed.
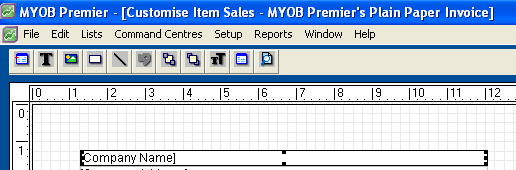
How can I resize a field?
Click once on the field to be resized (releasing your mouse button). Select one of the 8 border handles then drag the field's border to resize the field.
The window below shows a Data Field selected for resizing. Notice the 8 border handles (the small black dots spaced out around the field's border).
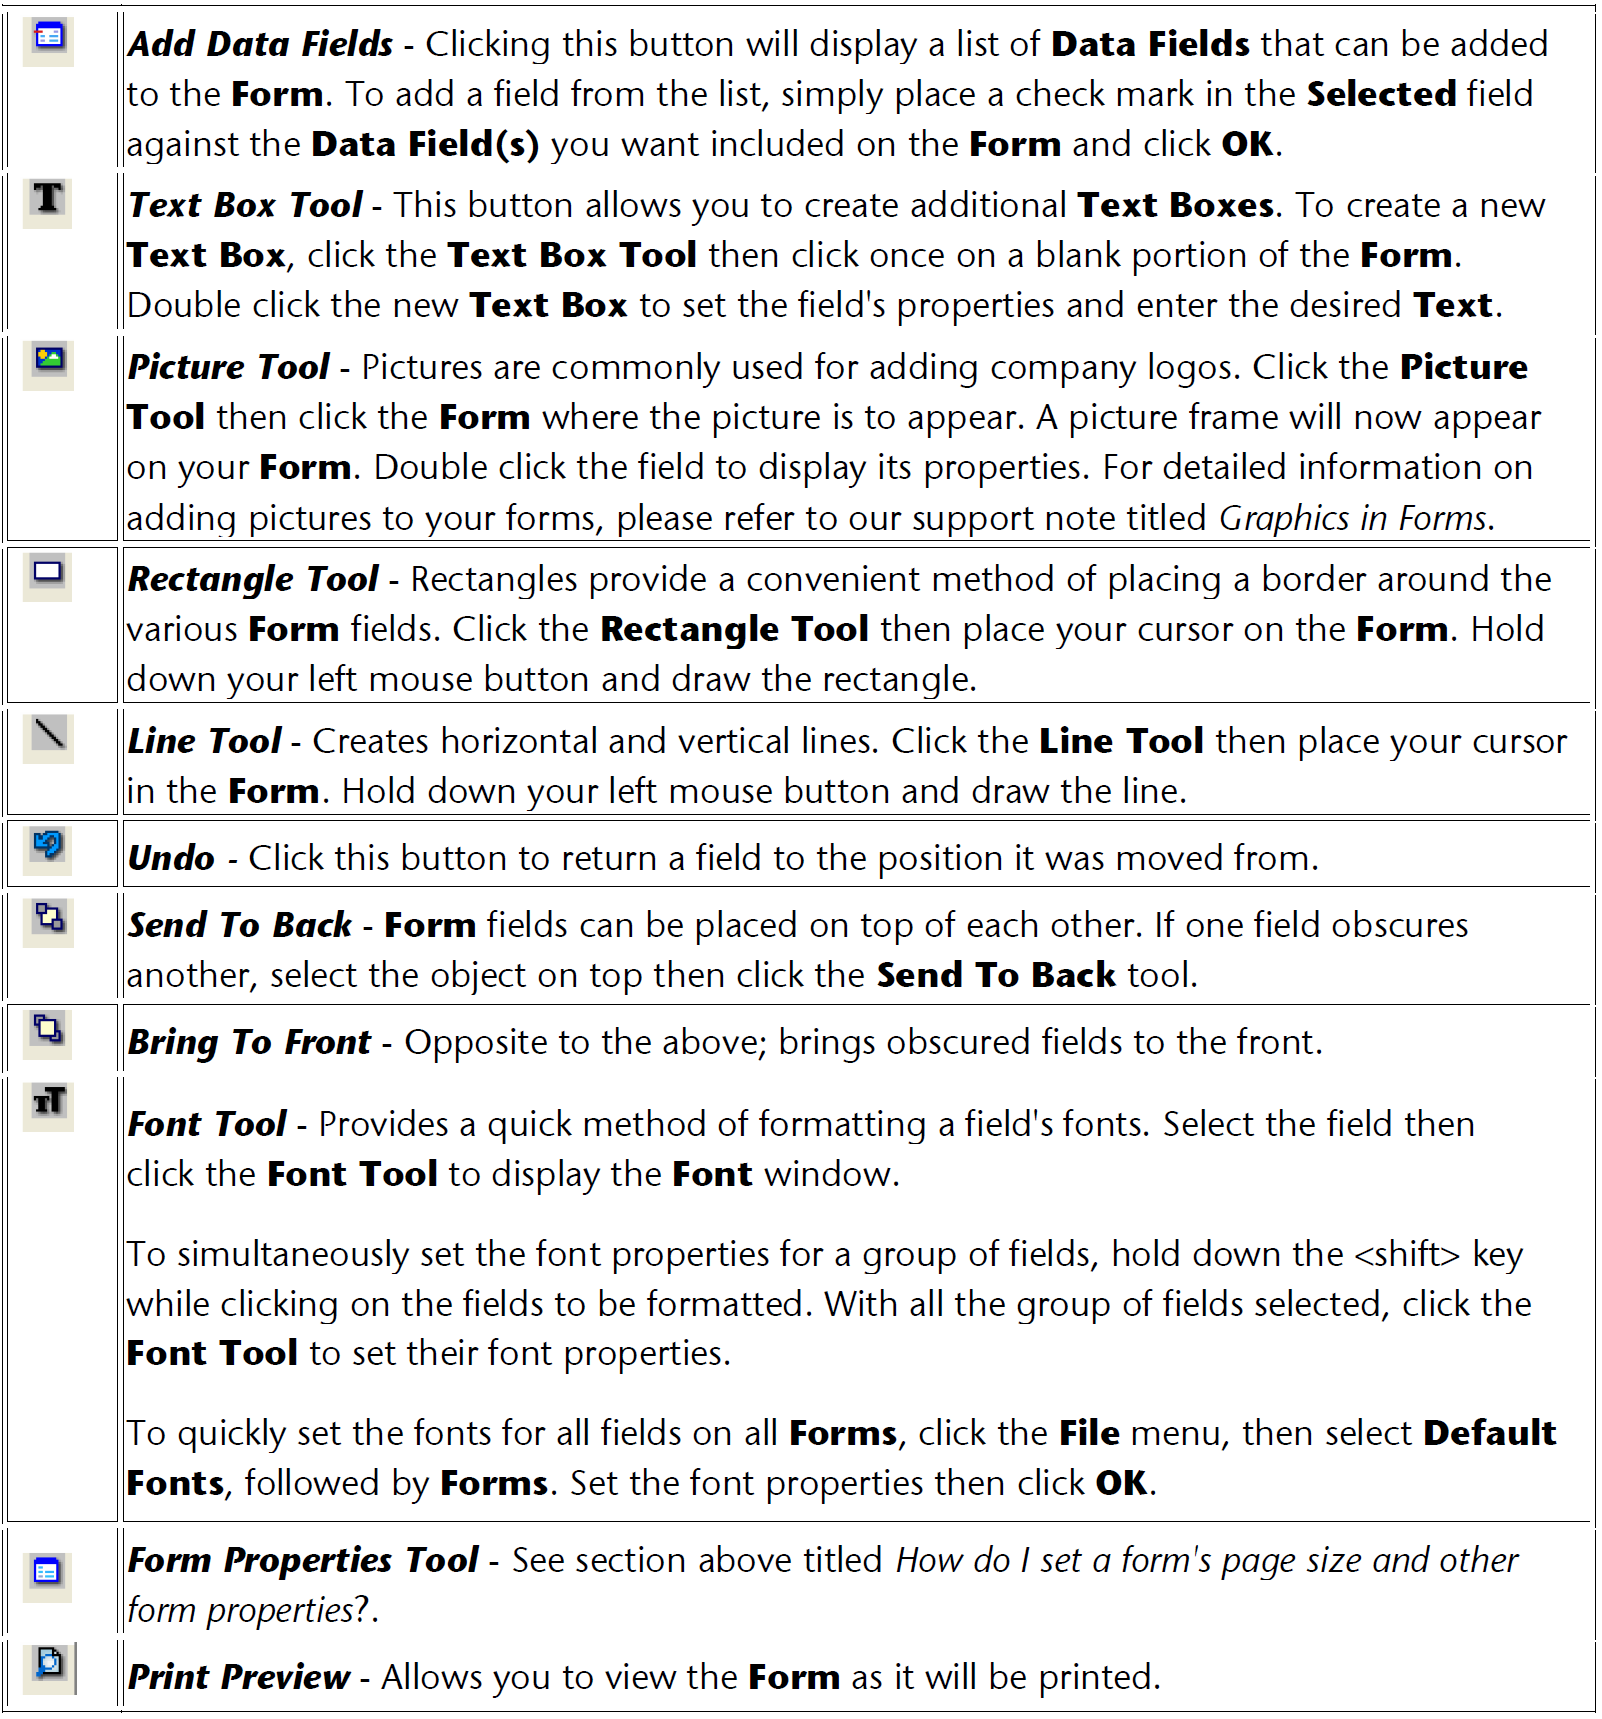
What tools are available for customising ABSS forms?
The window below shows the tool palette that is located at the top of the Customise Form window. The tool palette provides a range of formatting tools for adding effects and additional objects to your form.

The tool palette options are as follows:
How do I print using a customised form?
Cheques
- Click Banking, followed by Print Cheques.
- Click the Selected Form for Cheque field drop down arrow, highlight the desired from then click Use Form.
- Click OK.
Sales
Statements
- Click Sales, followed by Print Statements.
- Click the Statement Type field drop down arrow and select the desired Statement Type.
- Click the Selected Form for Statement field drop down arrow, highlight the desired form then click Use Form.
- Click OK.
Invoices
- Click Sales, followed by Print Invoices.
- Click the Form Layout field drop down arrow and select the desired Invoice type.
- Click the Selected Form for Invoice field drop down arrow, highlight the desired form then click Use Form.
- Click OK.
Receipts
- Click Sales, followed by Print Receipts.
- Click the Selected Form for Receipt field drop down arrow, highlight the desired form the click Use Form.
- Click OK.
Bills
- Click Purchases, followed by Print Purchase Orders.
- Click the Form Layout field drop down arrow and select the desired Bill type.
- Click the Selected Form for Purchase field drop down arrow. highlight the desired form then click Use Form.
- Click OK.
Mailing Labels
- Click Card File, followed by Print Mailing Labels.
- Click the Selected Form for Mailing Label field drop down arrow, highlight the desired from then click Use Form.
- Click OK.
How do I save a customised form?
Referring to the Customise Form window above, there are two options for saving a form.
Save Form
Click Save Form to save a form using the existing form name.
Save Form As
Use this option to save your formatting changes to a new form. After customising a form, click Save Form As, enter the Form File Name and Description, then click OK.
Frequently asked questions
How can I delete a field?
- Click the field or element to be deleted
- Go to the Edit menu and select Clear.
Deleted data type fields can be re-created by clicking on the Add Data Fields button on the tool palette
I can see a field on the form but when I click it, something else is displayed.
Click on the area where the field is placed then click the Send To Back toolbar button. You should now be able to select the other field.
My Invoices and Bills are printing with the wrong tax status.
The tax status of Invoices and Bills is determined by the form being used. For example, your Invoices are entered as tax inclusive but they are printing as tax exclusive.
Open your Bill or Invoice form and identify the affected price or amount data fields. You will notice that each price field has a prefix of either 'Inc' or 'Ex'. The 'Ex' prefix indicates that the field is tax exclusive and 'Inc' indicated that the field is tax inclusive.
To change the tax status of a form:
- Delete the price field(s).
- Click the Add Data Fields button on the form's toolbar.
- Select the price and amount fields that will print the amounts with the correct tax status.
- Click OK and position the field.
- Click Save Form As then enter the Form File Name and Description.
I receive a paper size error when printing my forms.
The window below shows an alert that is displayed if the form‘s paper size is different to the default paper size for your printer.
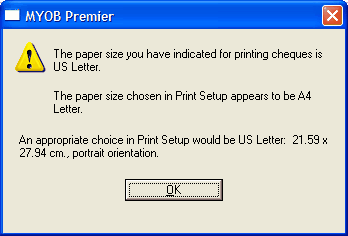
This is easily overcome by ensuring the form's Paper size, ABSS's Print Setup and your printer driver's default paper size are all set to the size of the paper loaded in your printer.
- Form's Paper size - to set the form‘s Paper size, please refer to the section titled How do I set a form ‘s page size and other properties?
- ABSS's Print Setup - open your company file, go to the File menu and select Print Setup (Macintosh - Page Setup). Click the Paper Size field drop down arrow then select the paper size of the paper that is loaded in your printer.
- Printer‘s setup - if you are unsure how to check or change your printer‘s setup, please check the Help function of your operating system or your printer's documentation.
Comments
0 comments
Article is closed for comments.